-
vagrant와 ansible으로 spring 배포하기ansible 2023. 8. 30. 00:53
사용방법
1. 깃허브에가서 클론을 한다.
https://github.com/TaeWoonJeong/ansible-with-spring
GitHub - TaeWoonJeong/ansible-with-spring
Contribute to TaeWoonJeong/ansible-with-spring development by creating an account on GitHub.
github.com
2. vagrant up 을 하면 된다.
주의사항
cfg.vm.network "public_network", ip: "192.168.219.101", bridge: "Hyper-V Virtual Ethernet Adapter"Vagrant 파일에서 이렇게 설정된게 있다.

본인 IP를 확인해서 바꿔주면 된다.
bridge설정도 본인 컴퓨터에 맞춰서 하면 된다.
spring 디렉터리에 application.yml이 있는데, 이것도 IP부분을 바꿔줘야한다.
vagrant로 virtualbox를 만들면, NAT가 자동 설정되어서, 로컬컴퓨터에서 public ip 주소로 접근이 불가능하다.. 그래서 forwarded_port를 사용해서 포트포워딩해줬다.
이러면 localhost:포트번호 로 접근 가능하다.
참고 블로그
https://takudaddy.tistory.com/352
Virtual Box 네트워크 설정 정리
[목차] 1. 들어가며 2. 기본 용어 정리 3. 네트워크 방식 설명 4. 참고 [들어가며] 버추얼박스로 취약 서버를 구축해 테스트 및 실습을 해야 할 일이 많은데 가상 서버간의 네트워크 통신과 관련한
takudaddy.tistory.com
참고 문헌
https://www.yes24.com/Product/Goods/65306887
우아하게 앤서블 - 예스24
현직 앤서블 강사가 직접 쓴 데브옵스의 모든 것IT 관리자들에게 IT 자원들을 운영하는 일은 항상 고민거리였다. 특히, 현재 가상화 및 클라우드 환경이 도래하면서 한 명의 IT 관리자가 운영해야
www.yes24.com
스프링 코드 설명
위에 깃허브에는 jar파일이 들어가 있는데, 코드가 궁금하다면, 아래 링크로 가면 있다.
https://github.com/TaeWoonJeong/ansible-with-spring-code
GitHub - TaeWoonJeong/ansible-with-spring-code
Contribute to TaeWoonJeong/ansible-with-spring-code development by creating an account on GitHub.
github.com
간단히 mysql과 redis에 데이터를 넣고 전체 조회하는 기능만 있다
Vagrant 설명
  #Ansible-Node101
  config.vm.define "ansible-node101" do |cfg|
    cfg.vm.box = "centos/7"
    cfg.vm.provider "virtualbox" do |vb|
      vb.name = "Ansible-Node101"
    end
    cfg.vm.host_name = "ansible-node101"
    cfg.vm.network "public_network", ip: "192.168.219.101", bridge: "Hyper-V Virtual Ethernet Adapter"
    cfg.vm.network "forwarded_port", guest: 22, host:60101, auto_correct: true, id: "ssh"
    cfg.vm.network "forwarded_port", guest: 80, host:8101, auto_correct: true, id: "nginx"
    cfg.vm.synced_folder "../data", "/vagrant", disabled: true
    cfg.vm.provision "shell", path: "./init/bash_ssh_conf_CentOS.sh"
    cfg.vbguest.auto_update = false
  end
centos7 을 사용한다.
localhost:8101로 접속하면 만들어진 centos의 80번포트로 보내준다.
./init의 bash_ssh_conf_CentOS.sh를 실행한다.
bash_ssh_conf_CentOS.sh
#!/usr/bin/env bash
now=$(date +"%m_%d_%Y")
cp /etc/ssh/sshd_config /etc/ssh/sshd_config_$now.backup
sed -i -e 's/PasswordAuthentication no/PasswordAuthentication yes/g' /etc/ssh/sshd_config
systemctl restart sshd
#centos reverse proxy setting
setsebool -P httpd_can_network_connect on
ansible은 ssh연결을 하는데, vagrantfile의 맨 아래에 ansible-server에서 centos에 ssh연결을 하기 위해
sed -i -e 's/PasswordAuthentication no/PasswordAuthentication yes/g' /etc/ssh/sshd_config를 해준다.
또한 localhost:8101로 오면 virtualbox의 80번포트로 가는데 centos에서 80번포트는 nginx가 보고 있고 nginx는 reverse_proxy 로 virtualbox 내부의 스프링이 돌고있는 8080포트로 보내주는 역할을 하기위해, selinux에서 httpd_can_network_connect를 켜준다.
참고 블로그
nginx failed (13: Permission denied) while connecting to upstream 오류
failed (13: Permission denied) while connecting to upstream 오류 해결방법 OS : CentOS7 nginx를 설치하고 포트를 모두 열어둔 상태로 다음과 같이 포트포워딩을 사용하려고 했다. server { listen 8089; server_name localhost;
cofs.tistory.com
다시 vagrantfile로 돌아와서 ubuntu설정을 보겠다.
  #Ansible-Node201
  config.vm.define "ansible-node201" do |cfg|
    cfg.vm.box = "bento/ubuntu-20.04"
    cfg.vm.provider "virtualbox" do |vb|
      vb.name = "Ansible-Node201"
    end
    cfg.vm.host_name = "ansible-node201"
    cfg.vm.network "public_network", ip: "192.168.219.201", bridge: "Hyper-V Virtual Ethernet Adapter"
    cfg.vm.network "forwarded_port", guest: 22, host:60201, auto_correct: true, id: "ssh"
    cfg.vm.network "forwarded_port", guest: 80, host:8201, auto_correct: true, id: "nginx"
    cfg.vm.synced_folder "../data", "/vagrant", disabled: true
    cfg.vbguest.auto_update = false
    cfg.vm.provision "shell", inline: "ln -s /usr/bin/python3 /usr/bin/python || true"
    cfg.vm.provision "shell", path: "./init/bash_ssh_passwd_conf_Ubuntu.sh"
  end
ln -s /usr/bin/python3 /usr/bin/python || true를 하는 이유는, ansible-server은 centos인데, ubuntu에 접근할때
"module_stderr": "/bin/sh: 1: /usr/bin/python: not found\n",
  "module_stdout": "", "msg": "MODULE FAILURE\nSee stdout/stderr for the exact error",
이런 에러가 나와서, ubuntu20.04에 설치되어있는 python3을 python으로 바꿔주는 역할을 한다.
혹시 처음에 vagrant up 해서 실패하는 경우 vagrant provision을 하는데, 이때 이미 python으로 변경되었다면 에러가 발생하고 더이상 진행하지 않기 때문에 || true로 항상 패스하게 만들었다.
bash_ssh_passwd_conf_Ubuntu.sh
#!/usr/bin/env bash

#ssh setting
now=$(date +"%m_%d_%Y")
cp /etc/ssh/sshd_config /etc/ssh/sshd_config_$now.backup
sed -i -e 's/#PermitRootLogin prohibit-password/PermitRootLogin yes/' /etc/ssh/sshd_config
systemctl restart ssh

#passwd setting
echo -e 'vagrant\nvagrant' | sudo passwd
ansible-server에서 ssh접근할 때 ubuntu에서 ssh설정해주는 문구
sed -i -e 's/#PermitRootLogin prohibit-password/PermitRootLogin yes/' /etc/ssh/sshd_config를 실행하고, ubuntu에서는 root password가 설정되어있지 않아서
echo -e 'vagrant\nvagrant' | sudo passwd로 설정해줬다.
다시 vagrantfile로 돌아와서 마지막 ansible-server설정을 보겠다.
  #Ansible-Server
  config.vm.define "ansible-server" do |cfg|
    cfg.vm.box = "centos/7"
    cfg.vm.provider "virtualbox" do |vb|
      vb.name = "Ansible-Server"
    end
    cfg.vm.host_name = "ansible-server"
    cfg.vm.network "public_network", ip: "192.168.219.10", bridge: "Hyper-V Virtual Ethernet Adapter"
    cfg.vm.network "forwarded_port", guest:22, host:60010, auto_correct: true, id: "ssh"
    cfg.vm.synced_folder "../data", disabled: true
    cfg.vbguest.auto_update = false
    cfg.vm.provision "shell", inline: "yum install epel-release -y"
    cfg.vm.provision "shell", inline: "yum install ansible -y"
    cfg.vm.provision "file", source: "./db",
      destination: "./db"
    cfg.vm.provision "file", source: "./init",
      destination: "./init"
    cfg.vm.provision "file", source: "./java",
      destination: "./java"
    cfg.vm.provision "file", source: "./nginx",
      destination: "./nginx"
    cfg.vm.provision "file", source: "./spring",
      destination: "./spring"

    cfg.vm.provision "shell", inline: "ansible-playbook ./init/ansible-server.yml"
    cfg.vm.provision "shell", inline: "ansible-playbook ./init/auto-pass.yml", privileged: false
    cfg.vm.provision "shell", inline: "ansible-playbook ./db/db.yml", privileged: false
    cfg.vm.provision "shell", inline: "ansible-playbook ./java/java-install.yml", privileged: false
    cfg.vm.provision "shell", inline: "ansible-playbook ./nginx/nginx-install.yml", privileged: false
    cfg.vm.provision "shell", inline: "ansible-playbook ./spring/send-spring-run.yml", privileged: false
  end
end
ansible-server에서 ansible설치를 위해 epel-release를 설치한다.
나머지 파일들을 전부 옮겨주고, ansible-playbook으로 실행시켜준다.
ansible-server.yml
---
- name: Setup Ansible Server
  hosts: localhost
  become: yes
  gather_facts: no

  tasks:
    - name: Add "/etc/ansible/hosts"
      blockinfile:
        path: /etc/ansible/hosts
        block: |
          [nodes]
          192.168.219.[101:102]
          192.168.219.[201:202]
          [db]
          192.168.219.150

    - name: Configure Bashrc
      lineinfile:
        path: /home/vagrant/.bashrc
        line: "{{ item }}"
      with_items:
        - "alias ans='ansible'"
        - "alias anp='ansible-playbook'"
hosts를 localhost로 했으므로, ansible-server에서만 실행된다.
become:yes 를해서 root로 실행한다.
ansible host에 node들을 등록한다.
ansible, ansible-playbook을 alias 등록한다.
auto-pass.yml
---
- name: Create authority between server and nodes
  hosts: nodes:db
  connection: local
  serial: 1
  gather_facts: no

  tasks:
    - name: ssh-keyscan for known_hosts file
      command: /usr/bin/ssh-keyscan -t ecdsa {{ ansible_host }}
      register: keyscan

    - name: input key
      lineinfile:
        path: ~/.ssh/known_hosts
        line: "{{ item }}"
        create: yes
      with_items:
        - "{{ keyscan.stdout_lines }}"

- name: Create authorized_keys between server and nodes
  hosts: nodes:db
  connection: local
  gather_facts: no
  vars:
    ansible_password: vagrant

  tasks:
    - name: ssh-keygen for authorized_keys file
      command: "ssh-keygen -b 2048 -t rsa -f ~/.ssh/id_rsa -q -N ''"
      ignore_errors: yes
      run_once: true

    - name: input key for each node
      connection: ssh
      authorized_key:
        user: vagrant
        state: present
        key: "{{ lookup('file', '~/.ssh/id_rsa.pub') }}"
hosts 가 nodes와 db이므로 각각 host에게 가서 ssh-keyscan을 해서 나온 결과를 ansible-server의 known_hosts에 적어준다.(안적어주면, 나중에 node에게 통신할때 'yes' 입력을 해야한다.)
다음으로, ansible-server이 node들에게 ssh접근을 하기위해, ansible-server에서 비밀번호를 '' 으로 한 ssh-key를 만든다. id_rsa라고 적긴했지만, 안적어도 기본적으로 id_rsa로 나온다.
ssh-keygen이 성공하면, id_rsa(비밀키), id_rsa.pub(공개키) 이렇게 2개가 나오는데, 노드들에게 id_rsa.pub값이 ~/.ssh/authorized_keys 에 추가된것을 볼 수 있다.
db.yml
- name: Install epel-release for {{ ansible_distribution }}
      action: "{{ ansible_pkg_mgr }} name=epel-release state=latest"

- name: Download MySQL repository RPM
  get_url:
    headers:
      user-agent: curl/7.81.0
    url: https://dev.mysql.com/get/mysql80-community-release-el7-6.noarch.rpm
    dest: /tmp/mysql80-community-release-el7-6.noarch.rpm
일단 {{ ansible_distribution }} 이나 {{ ansible_pkg_mgr }} 같은거는 ansible facts에 있는 값이어서, 이렇게 쓰면된다.
각 노드들의 facts값 확인하는 방법
ansible all -m setup > facts.txt를 하면 된다.
get_url로 rpm 파일 다운받으려니 안되서 hearder에 user-agent 부분을 추가해서 해결했다.
- name: Install MySQL RPM
      yum:
        name: /tmp/mysql80-community-release-el7-6.noarch.rpm
        state: present

- name: Disable GPG check for mysql80-community repo
  shell: sed -i 's/gpgcheck=1/gpgcheck=0/' /etc/yum.repos.d/mysql-community.repo

- name: Install MySQL-Server
  yum:
    name: mysql-server
    state: present

- name: Start MySQL service
  service:
    name: mysqld
    state: started
    enabled: yes
다운받은 rpm파일을 설치해주고, gpgcheck=1 에서 gpgcheck=0으로 바꿔준다음, 설치하고, 실행한다.
- name: Install Redis
      yum:
        name: redis
        state: present

- name: Disable Redis bind
  shell: sed -i 's/bind 127.0.0.1/# bind 127.0.0.1/' /etc/redis.conf

- name: Disable Redis protected-mode
  shell: sed -i 's/protected-mode yes/protected-mode no/' /etc/redis.conf

- name: Start Redis service
  service:
    name: redis
    state: started
    enabled: yes
redis는 그냥 설치하면 되는데, 외부에서 접근가능해야하므로 몇가지 설정을 바꿔준다음 실행해준다.
- name: Copy MySQL password script to remote node
  copy:
    src: mysql-init.sh
    dest: /tmp/mysql-init.sh
    mode: "0755"

- name: Execute MySQL password script
  command: /tmp/mysql-init.sh
mysql-init.sh파일을 복사하고 실행한다.
mysql-init.sh
#!/bin/bash

# Find the temporary password from the MySQL log
temp_password=$(sudo grep 'temporary password' /var/log/mysqld.log | awk '{print $NF}')

if [ -z "$temp_password" ]; then
  echo "Failed to find the temporary password in the MySQL log."
  exit 1
fi

# Log in to MySQL and change the password
mysql -u root --connect-expired-password -p"$temp_password" <<EOF
ALTER USER 'root'@'localhost' IDENTIFIED BY 'Abcd1234!';
EOF

mysql -u root -p"Abcd1234!" <<EOF
CREATE USER 'root'@'%' IDENTIFIED BY 'SpringMySQL1!';
GRANT ALL PRIVILEGES ON *.* TO 'root'@'%' WITH GRANT OPTION;
FLUSH PRIVILEGES;
EOF

mysql -u root -p"Abcd1234!" <<EOF
CREATE DATABASE ansible;
EOF
mysql에서 최초접속시 비밀번호를 찾아서, temp_password변수에 저장하고, mysql에 접속한다. 최초접속하면, 비밀번호를 반드시 바꿔야 db조회든 뭐든 할 수 있어서, 비밀번호를 Abcd1234!로 바꿔줬다.
다른 node들에서 스프링을 실행해서, db에 접근해야 하므로, user을 하나 만들어준다. 'root'@'%'로 모든 IP에서 접근 가능하게 해준다.
springboot에서 사용하는 database를 만들어준다.
java-install.yml
스프링이 자바17로 만들었으므로 centos와 ubuntu에 java17을 설치한다.
---
- name: Install java on the nodes
  hosts: nodes
  become: yes

  roles:
    - role: ./roles
roles를 지정해서, 각각 node들에게 자바 설치를 한다.
nginx-install.yml
---
- name: Install nginx on the nodes
  hosts: nodes
  become: yes

  roles:
    - role: ./roles
nodes들에게 nginx를 설치한다.
설치하고, config.yml을 보면
---
- name: port from 80 to 8080
  copy:
    src: nginx.conf
    dest: /etc/nginx/nginx.conf
    mode: 0644
  notify:
    - restart nginx web server
이렇게 있는데 file디렉터리에 nginx.conf를 /etc/nginx/nginx.conf로 복사해준다.
nignx.conf
events {
    worker_connections  1024;
}
http{
    server {
            listen       80;
            listen       [::]:80;
            server_name  localhost;
            root         /usr/share/nginx/html;

            location / {
                    proxy_pass http://localhost:8080;
                    proxy_set_header X-Real-IP $remote_addr;
                    proxy_set_header X-Forwarded-For $proxy_add_x_forwarded_for;
                    proxy_set_header Host $http_host;
            }
    }
}
nginx가 80번으로 받으면, localhost:8080으로 전달해준다.
send-spring-run.yml
---
- name: Send Spring And Run
  hosts: nodes
  become: yes

  tasks:
    - name: Send application.yml
      copy:
        src: application.yml
        dest: /home/vagrant/
        mode: "0755"

    - name: Send Spring
      copy:
        src: ansible-spring.jar
        dest: /home/vagrant/
        mode: "0755"

    - name: Run Spring
      shell: "nohup java -jar -Dspring.config.location=/home/vagrant/application.yml ansible-spring.jar 1>>spring.log 2>>spring-error.log &"
application.yml을 복사하고, 스프링jar파일도 복사한다음 실행해준다.
nohup이어서 1(표준출력)인 경우 spring.log에 로그를 쓰고, 2(에러)인 경우 spring-error.log에 쓴다.
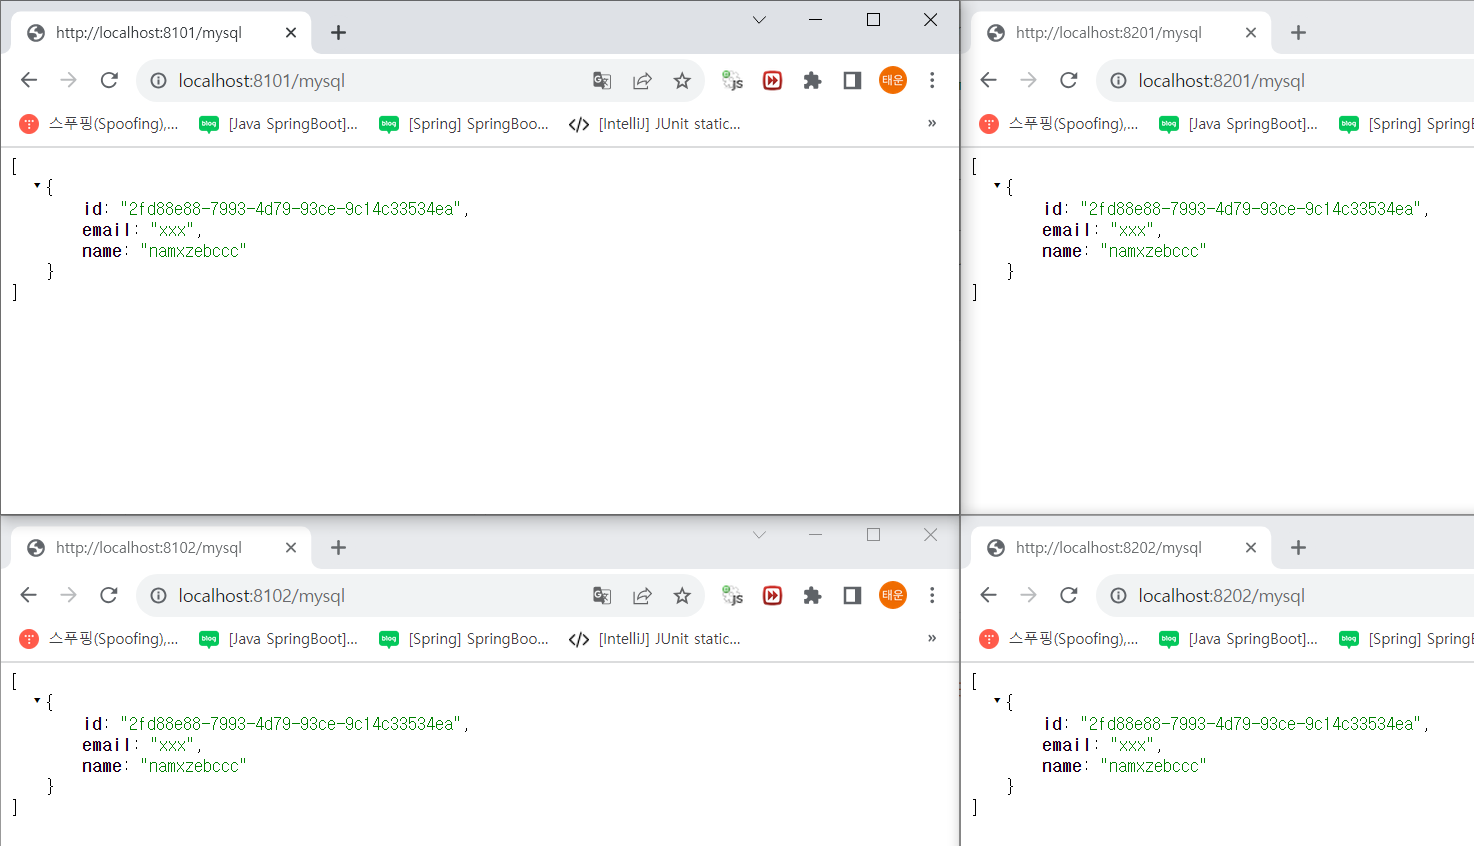
실행 결과

postman으로 4개중에 아무데나 /mysql 경로로 post 요청을 보내본다.
{
    "email":"xxx",
    "name":"namxzebccc"
}
이렇게 보내고, 전부 조회해보자.
redis도 마찬가지로 4개중 하나에 /redis 경로로 post 요청을 보내보자.
{
    "email":"redisemail",
    "name":"namxzebccc"
}
이렇게 보내본다.

잘 작동한다.
마지막으로 ansible-db에 가서 확인해본다.


redis의 경우 ttl이 600초여서 10분 지나면 없어진다.
다음은 ansible로 k8s 클러스터 구성을 해보겠다.